> For the complete documentation index, see [llms.txt](https://docs.hava.io/llms.txt). Markdown versions of documentation pages are available by appending `.md` to page URLs; this page is available as [Markdown](https://docs.hava.io/aws-marketplace.md).
# AWS Marketplace
### HOW TO SUBSCRIBE TO HAVA VIA AWS MARKETPLACE
Navigate to the AWS Marketplace console.

Search for Hava:

Select "Hava Monthly Subscription"
When using the AWS marketplace, Hava is purchased on a month by month subscription basis with no lock in contracts. You can cancel at any time.

Select purchase options.
The first decision is whether to auto renew at the end of the first month. Set this to yes to avoid your account being disabled after 30 days and your diagram version history being removed,
 Next select the plan that best suits your needs from Professional or Team.
Professional includes 5 sources. Sources are cloud accounts, so you could connect this AWS account plus four more, or mix and match with Microsoft Azure or Google Cloud Platform accounts. Full details of what is included in the two plans can be found on the [Hava Pricing Page](https://www.hava.io/pricing).

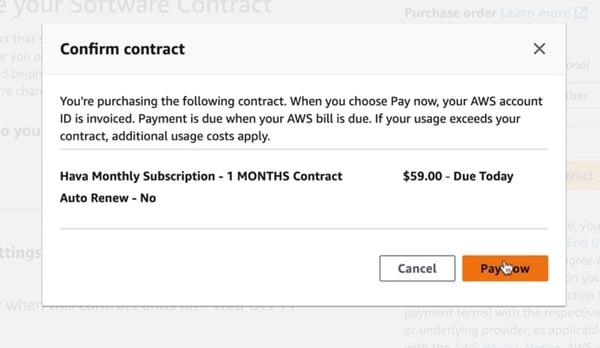
In this example, we will proceed with a Professional plan by clicking on the "Create Contract" button.

AWS will prompt you to confirm the contract. Billing will be immediate and set up via the payment method you use for your AWS account.
Next select the plan that best suits your needs from Professional or Team.
Professional includes 5 sources. Sources are cloud accounts, so you could connect this AWS account plus four more, or mix and match with Microsoft Azure or Google Cloud Platform accounts. Full details of what is included in the two plans can be found on the [Hava Pricing Page](https://www.hava.io/pricing).

In this example, we will proceed with a Professional plan by clicking on the "Create Contract" button.

AWS will prompt you to confirm the contract. Billing will be immediate and set up via the payment method you use for your AWS account.
 You will then be prompted to create your Hava account.

*\*note the $0 due today shown on this screen is a glitch in the AWS marketplace flow which doesn't affect your subscription and has been reported. You will be charged the amount shown in the previous confirm contract screen.*
Click on set up your account.
You will then be prompted to create your Hava account.

*\*note the $0 due today shown on this screen is a glitch in the AWS marketplace flow which doesn't affect your subscription and has been reported. You will be charged the amount shown in the previous confirm contract screen.*
Click on set up your account.
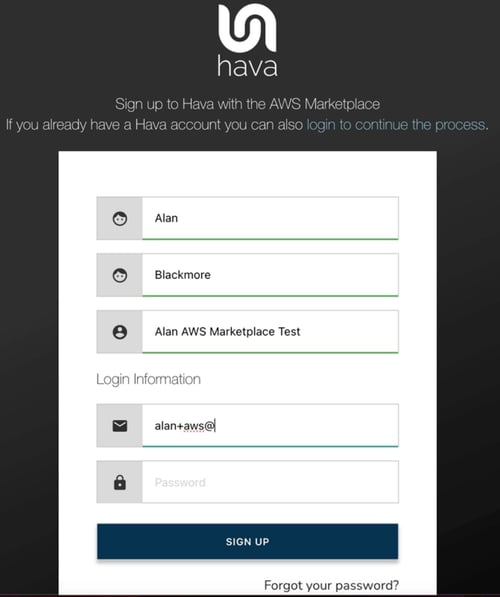 Enter your name, a name for the account (can be anything) and log in details being an email address and password.
Make sure you use your best email as you will need to confirm it as part of the sign up process.
You will then get a message saying the marketplace integration is being set up and to not close or reload the page while this is processing.
You will then be logged into your Hava console and can add you first data source.
### CONNECTING AWS TO HAVA
Adding an AWS data source.

Take the first option : Import your own environments.

Next we need to set up a read-only IAM cross account role. To do this, make sure you are logged into the AWS account you wish to connect then click the auto button.

Select AWS account (this will be pre-selected). "Another AWS Account" will also be pre selected along with the Hava account ID.
Ensure you leave the "Require MFA" unchecked.

Next name and create the new role.
Enter your name, a name for the account (can be anything) and log in details being an email address and password.
Make sure you use your best email as you will need to confirm it as part of the sign up process.
You will then get a message saying the marketplace integration is being set up and to not close or reload the page while this is processing.
You will then be logged into your Hava console and can add you first data source.
### CONNECTING AWS TO HAVA
Adding an AWS data source.

Take the first option : Import your own environments.

Next we need to set up a read-only IAM cross account role. To do this, make sure you are logged into the AWS account you wish to connect then click the auto button.

Select AWS account (this will be pre-selected). "Another AWS Account" will also be pre selected along with the Hava account ID.
Ensure you leave the "Require MFA" unchecked.

Next name and create the new role.
 Create the role. Then from the roles dashboard, open the new role (in this example Hava\_AWS) and copy the role ARN

Return to Hava and paste in the ARN

The click import and Hava will scan the connected AWS account and create interactive diagram sets for every VPC discovered in the account.
Depending on the size and number of environments in your AWS account this will take from a few seconds to a few minutes.

Tiles will appear on your Hava dashboard depicting the discovered VPCs or container workloads in the connected account.
Selecting a VPC will open the architecture diagram.

From there you can navigate around the diagram, select resources to view the related attributes, connected resources etc. You can also open the security view to see the security groups, ports, protocols and how traffic moves in and out of the VPC

At this point Hava is now monitoring the configuration of all the VPCs running in your AWS account.
Any changes are detected and new diagrams are generated with the superseded diagrams being placed in version history.
You can set architectural monitoring alerts that will send you an email with a diff diagram every time a diagram is updated. You can also manually generate a diff diagram by comparing any two diagram revisions in the versions menu.
To subscribe to Hava via AWS marketplace follow the instructions above.
{% embed url="" %}
Create the role. Then from the roles dashboard, open the new role (in this example Hava\_AWS) and copy the role ARN

Return to Hava and paste in the ARN

The click import and Hava will scan the connected AWS account and create interactive diagram sets for every VPC discovered in the account.
Depending on the size and number of environments in your AWS account this will take from a few seconds to a few minutes.

Tiles will appear on your Hava dashboard depicting the discovered VPCs or container workloads in the connected account.
Selecting a VPC will open the architecture diagram.

From there you can navigate around the diagram, select resources to view the related attributes, connected resources etc. You can also open the security view to see the security groups, ports, protocols and how traffic moves in and out of the VPC

At this point Hava is now monitoring the configuration of all the VPCs running in your AWS account.
Any changes are detected and new diagrams are generated with the superseded diagrams being placed in version history.
You can set architectural monitoring alerts that will send you an email with a diff diagram every time a diagram is updated. You can also manually generate a diff diagram by comparing any two diagram revisions in the versions menu.
To subscribe to Hava via AWS marketplace follow the instructions above.
{% embed url="" %}